15 Tips And Tricks To Use Apple Calendar On Mac
1. Share a calendar
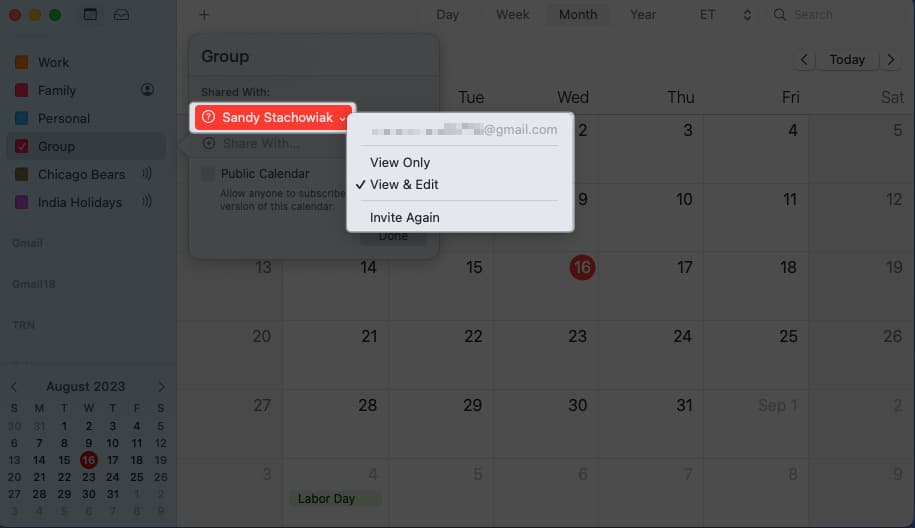
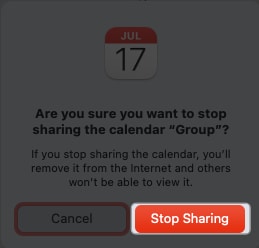
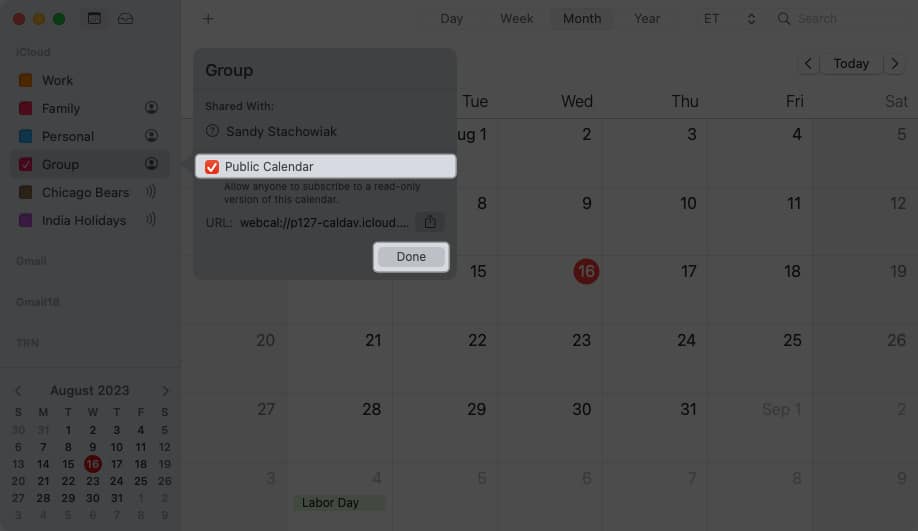
If you want to collaborate on events or let your family know what’s on your schedule, you can share an iCloud calendar. When you choose those you want to share with, you can set their permissions as well. So, they can have the ability to edit the calendar or simply view it. To stop sharing a calendar, open the calendar and select Edit → Stop Sharing in the menu bar. Then, confirm in the pop-up window. Alternatively, delete the contact in the sharing menu where you added them. If you prefer to share with a large group, like on your website or blog, check the box for Public Calendar in the sharing pop-out menu and click Done. You’ll then see the URL for the calendar with a share option.
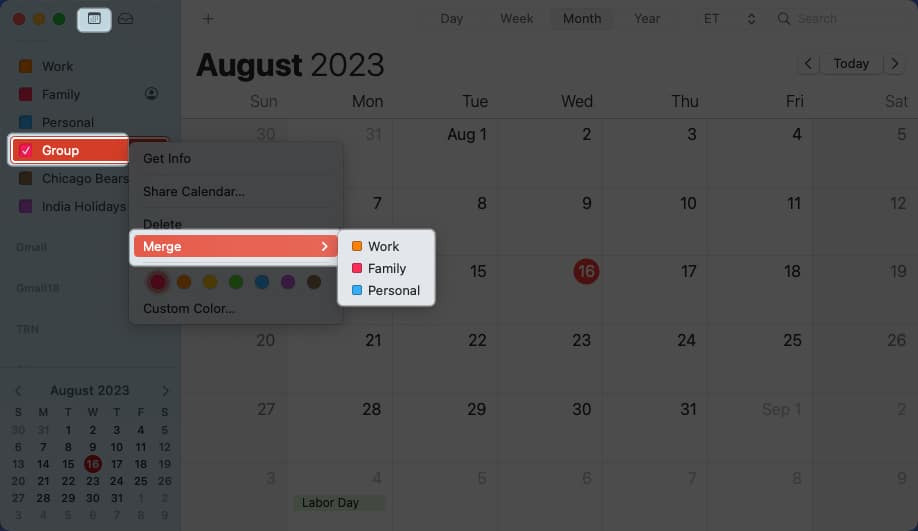
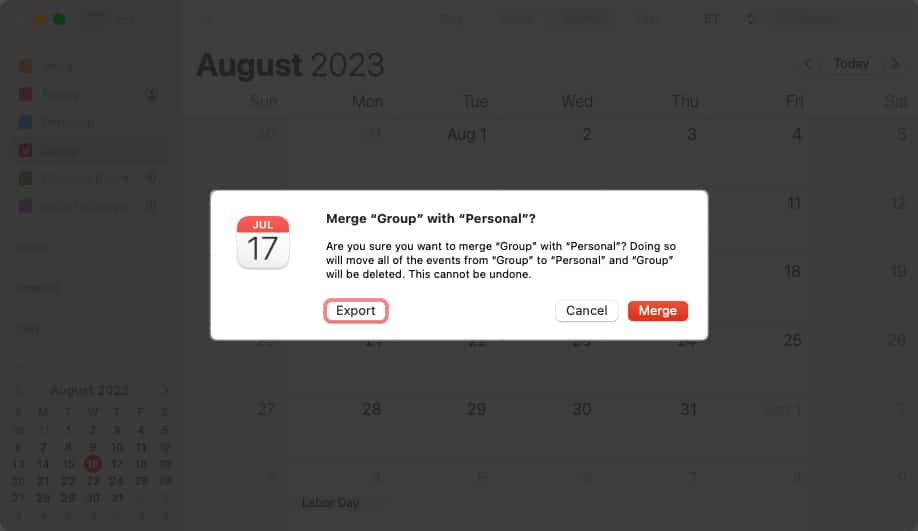
2. Merge calendars
Because it’s so easy to create a new calendar, you may end up with more than one that is similar to each other. You can merge calendars to turn two iCloud calendars into one.
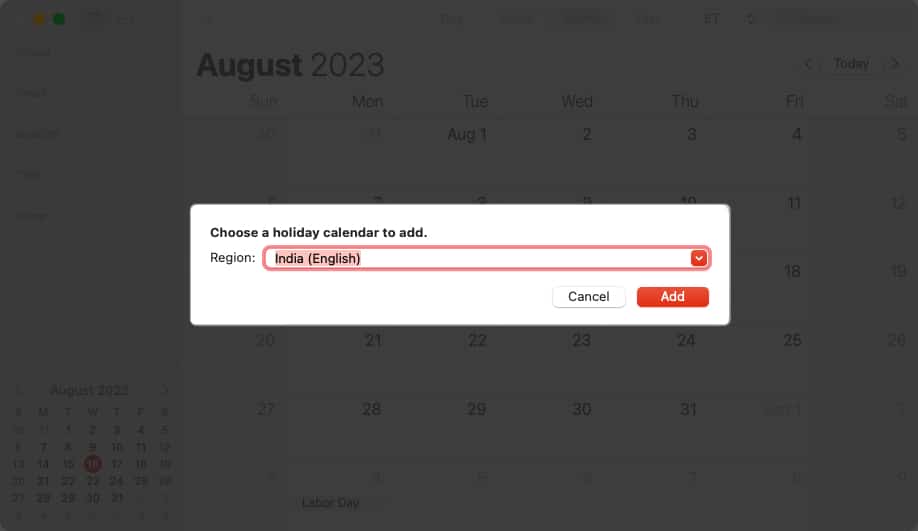
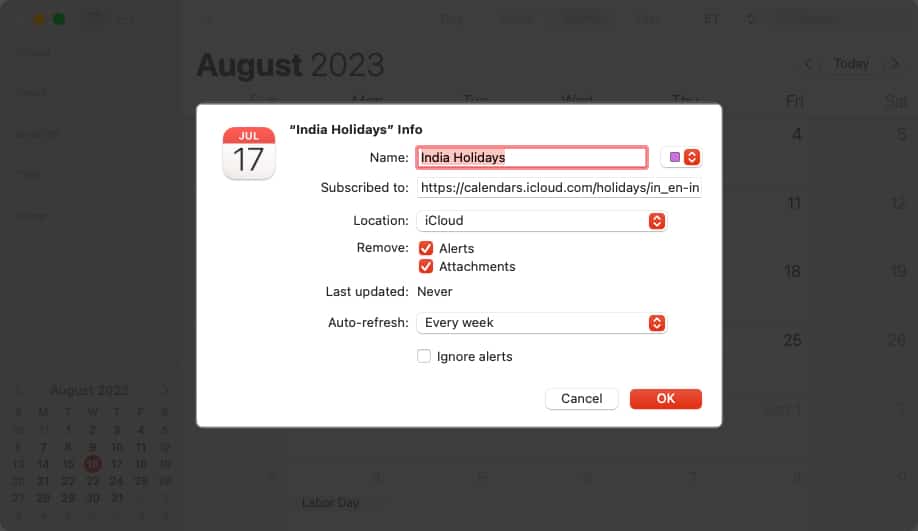
3. Add an international holiday calendar
To keep up with national holidays, you can add a holiday calendar to the Calendar app on Mac. But, did you know you can add a holiday calendar from other parts of the world too? This is handy if you work with others from around the globe. You should then see your new calendar in the app’s sidebar.
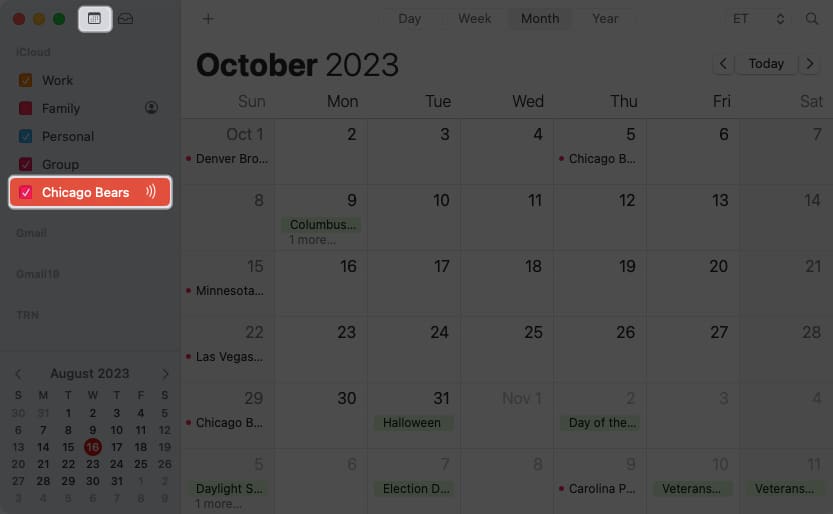
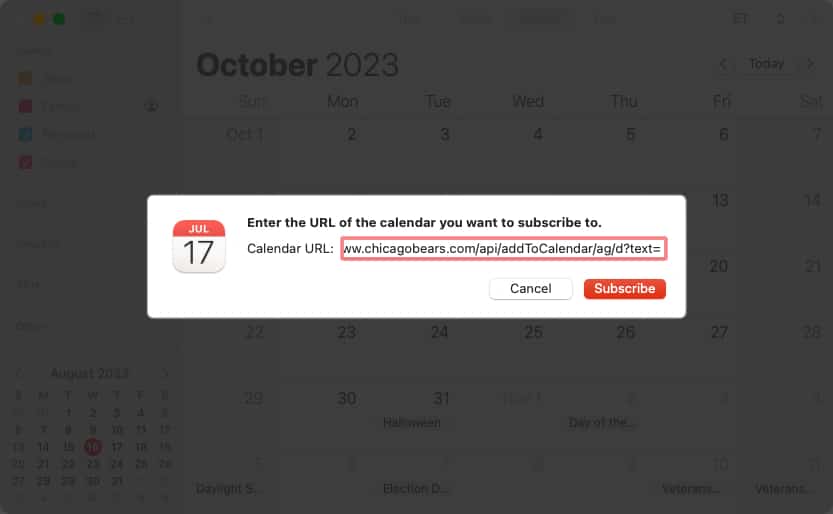
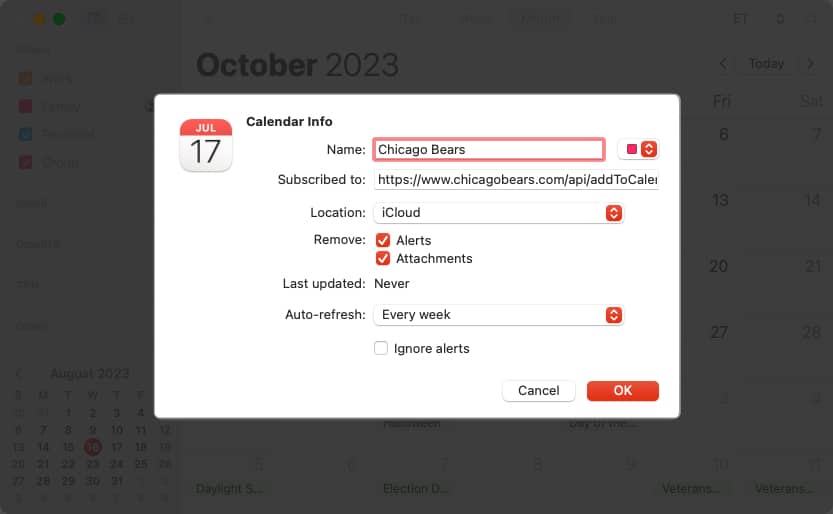
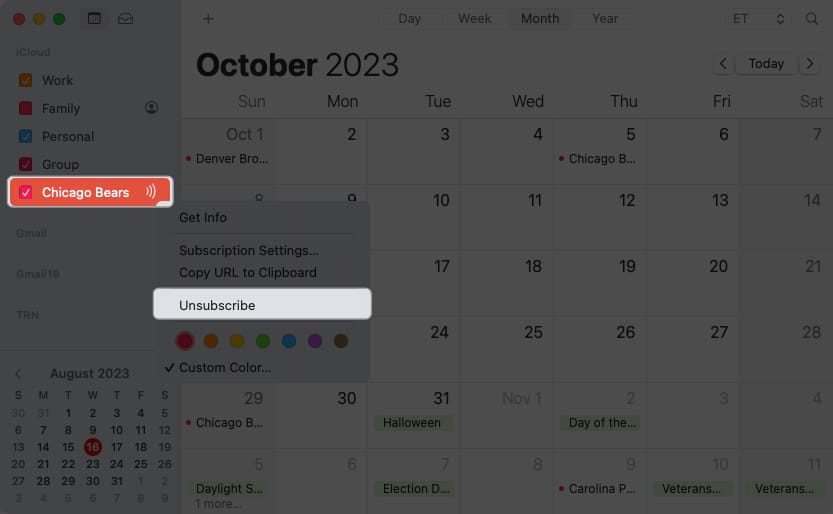
4. Subscribe to calendar
Along with adding a holiday calendar, you can subscribe to a calendar like one for your child’s school or favorite sports team. To begin, you’ll need the URL for the calendar, so grab that first and then follow these steps. You’ll then see your calendar in the sidebar. To make changes or unsubscribe, use Edit in the menu bar or right-click the calendar in the sidebar.
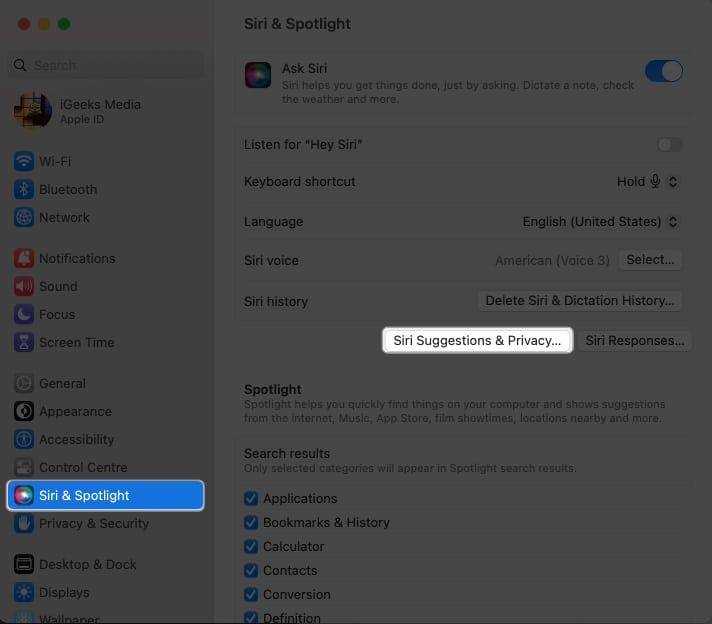
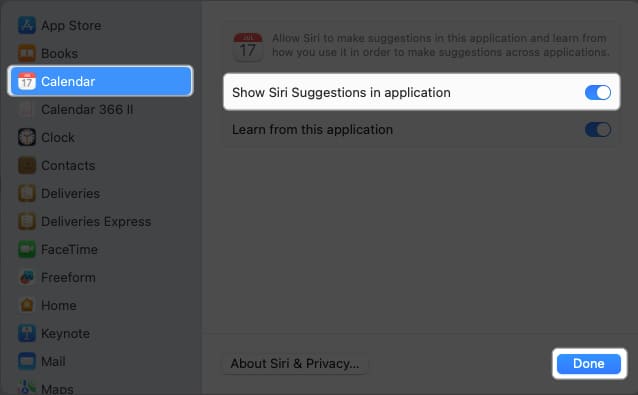
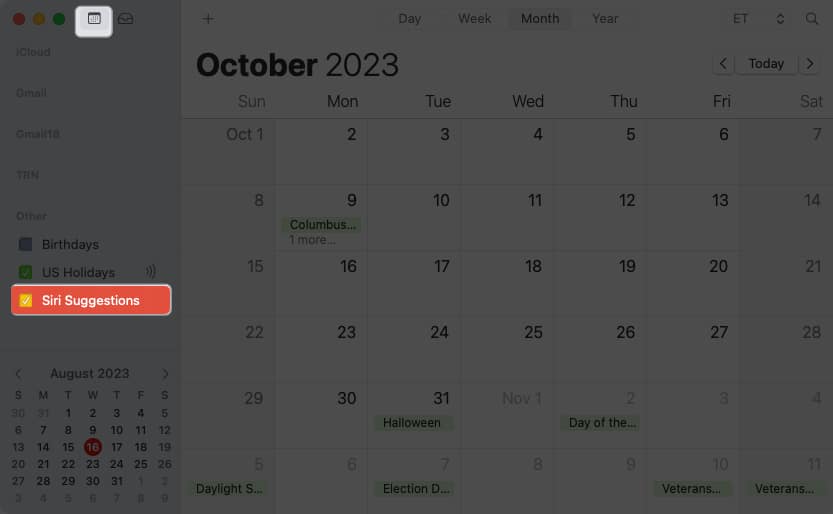
5. Enable Siri suggestions
When dates pop up in spots like emails or messages, you can have Siri suggest these events for your calendar. This is a convenient way to add events without extra effort. When you return to the Calendar app, you’ll see the Siri Suggestions option in the Other section of the sidebar. By checking the box, you’ll see those suggested events display on your calendar.
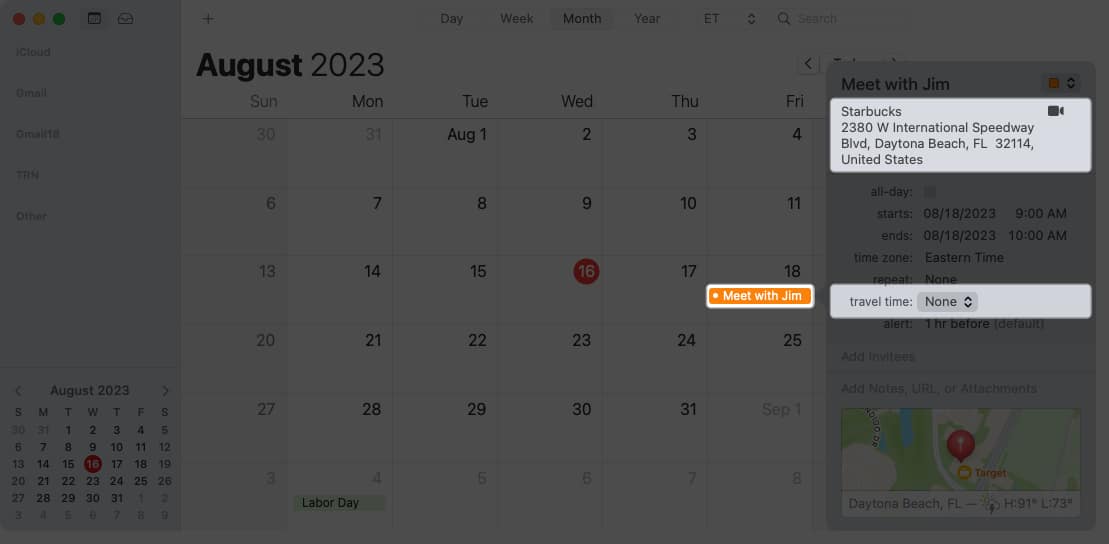
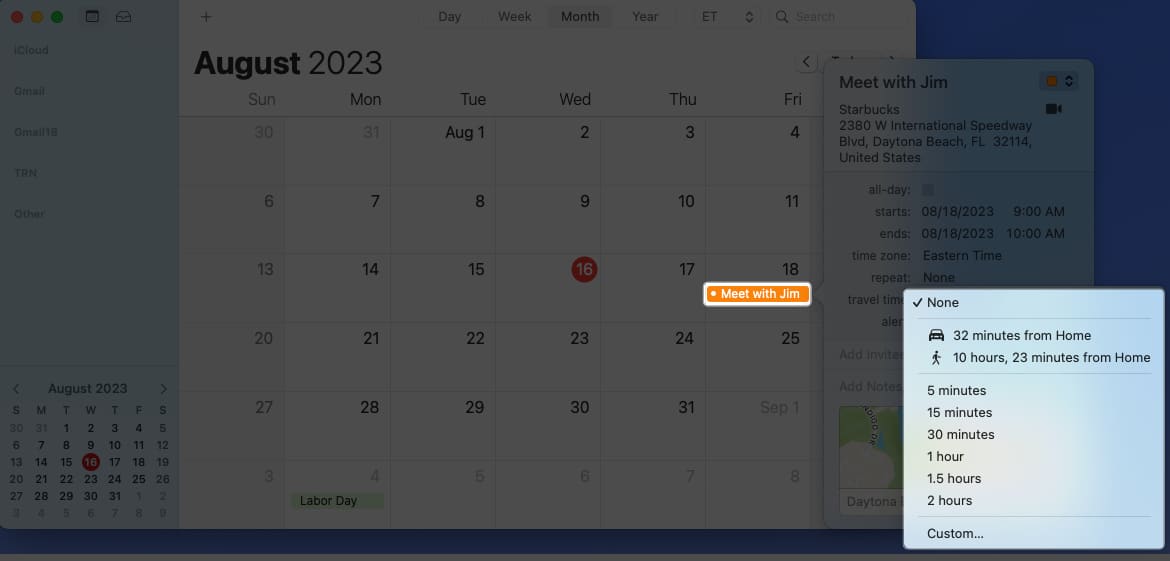
6. Use travel time notifications
You probably already know that you can use Calendar notifications so that you receive alerts before events begin. But if you have to travel to your event, you can receive a notification based on the time it’ll take you to get there. You’ll then receive your calendar alert based on your travel time which is especially handy for lengthy trips to events.
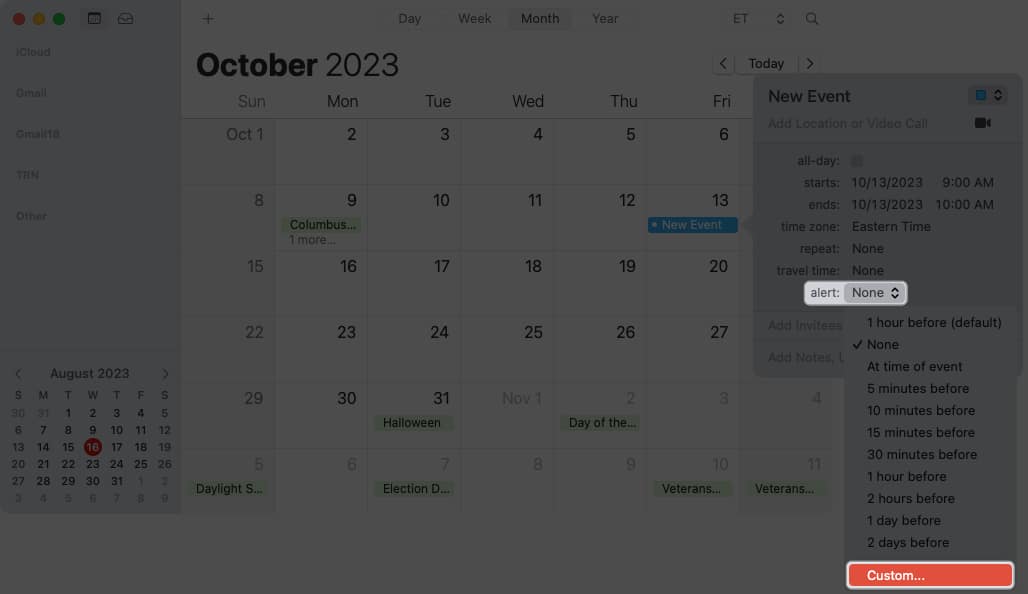
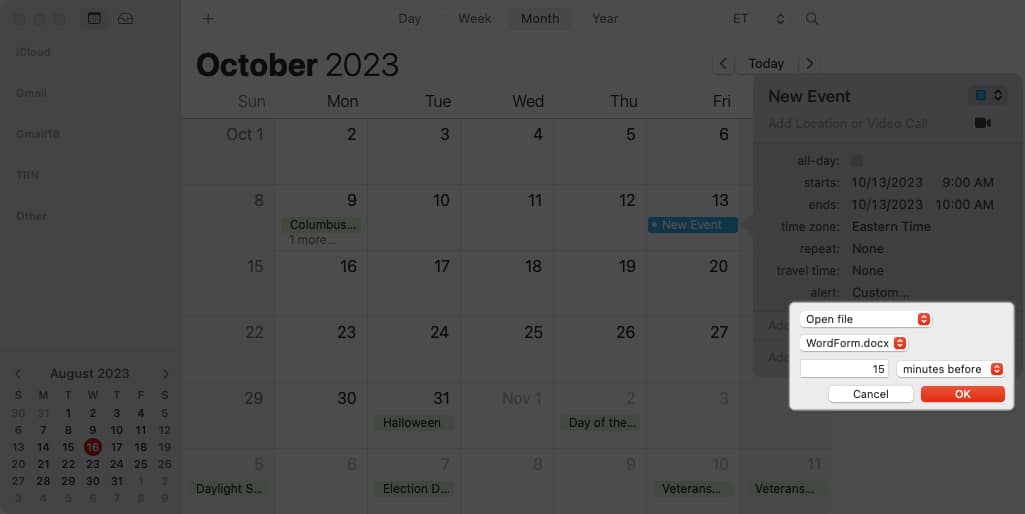
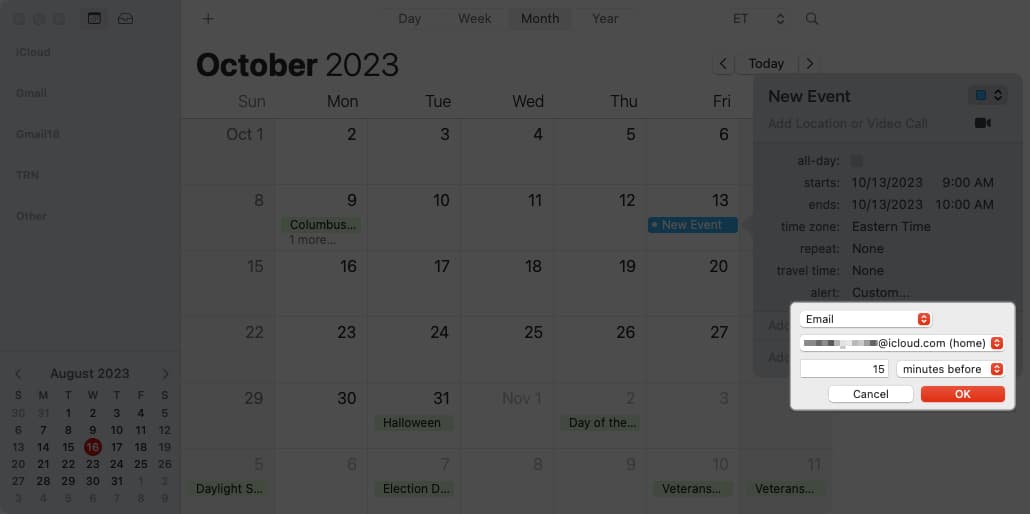
7. Automatically open a file or receive an email before an event
If you want to refer to a file in your meeting or receive an email with the meeting’s date and time before an event begins, you can use these as Calendar alerts. You can choose a file and have it open or an email account and get a message at the time you pick. When the alert time arrives before your event, you’ll see the file open or receive the email.
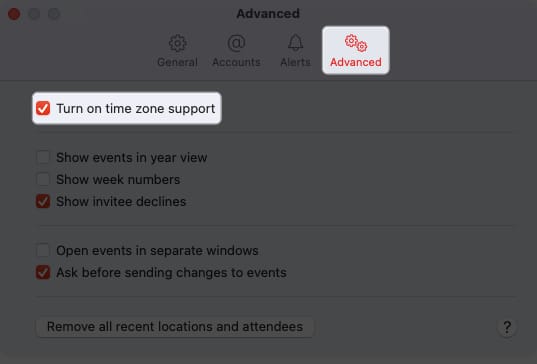
8. Turn on time zone support
When you plan events with others who live in different time zones, you may have to account for the time difference. With Time Zone Support turned on in Calendar, you can set and view events in the time zone of your choice. You’ll then see a time zone drop-down box on the top right of your Calendar window. Use it to see all Calendar events in that time zone. You also have a time-zone drop-down option inside the event window that you can use when scheduling an event.
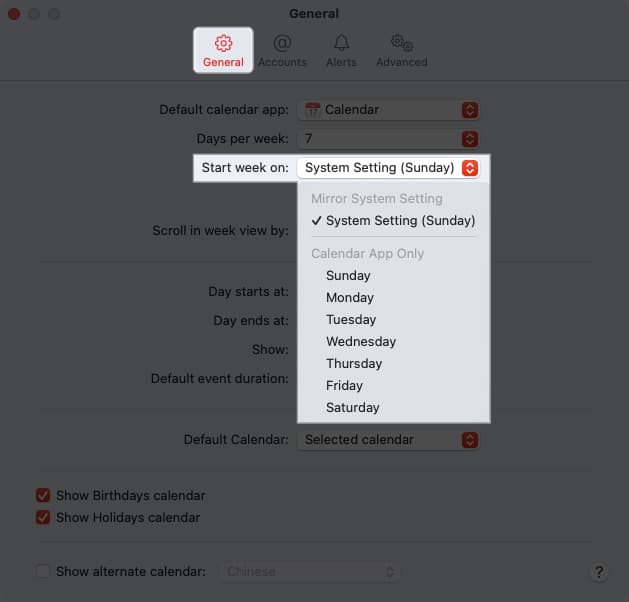
9. Change week start day
We all know that a week officially begins on Sunday. But if you want your calendar to show weeks starting on a different day, like Monday, for the workweek, you can change this in a few clicks. You’ll then see your calendar update to begin weeks on that day.
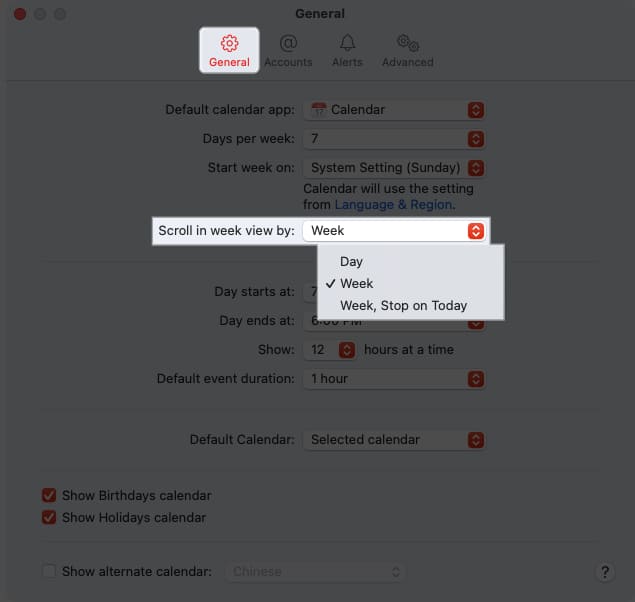
10. Adjust scroll in Week view
When you use the Week view in Calendar, you can use the arrows on the top right to move to the next or previous week. If you find that you are moving by day instead of week and find it tedious, you can change it. Once you make the change, return to your calendar and use the buttons to move forward or back to test your new setting.
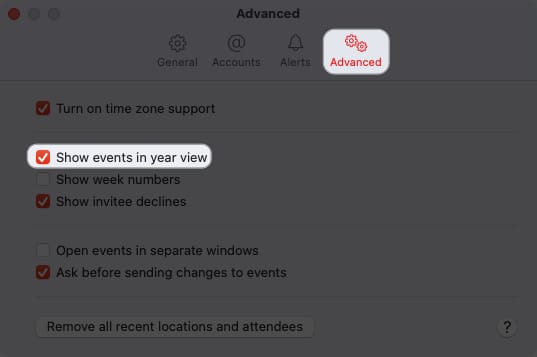
11. Show events in Year view
Another simple but useful setting you may want to adjust in Calendar is the Year view. While this gives you an overview of dates for the year, you may want to highlight those dates with events planned. You should see dates with events highlighted.
12. Create Quick Event
To schedule an event in the Calendar app, you simply select the date or the date and time. But, you can also create what’s called a Quick Event using natural language. For example, you can type “Dinner at 8pm Saturday” or “Dentist appointment tomorrow morning at 9.” You’ll then see the event display on your calendar as instructed. Tip: You can schedule all day events the same way by inserting “all day” into your phrase. For instance, you can type “Our anniversary all day Friday.”
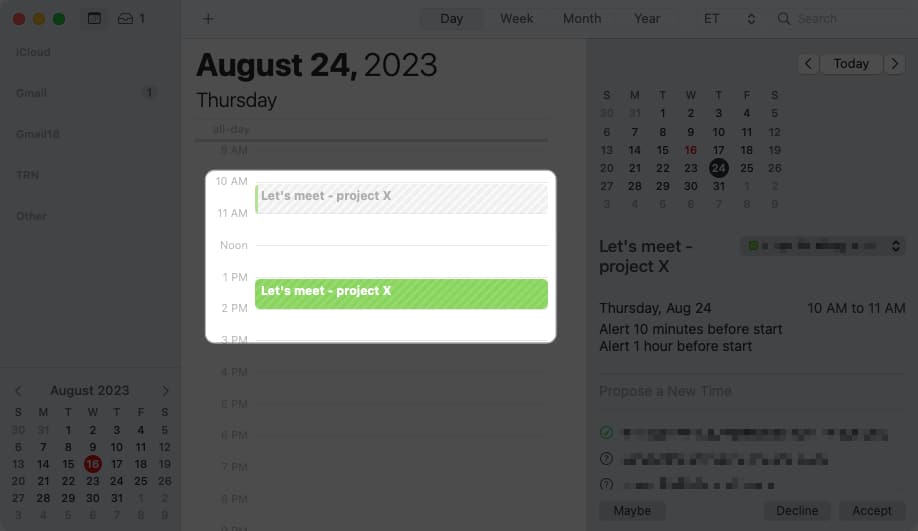
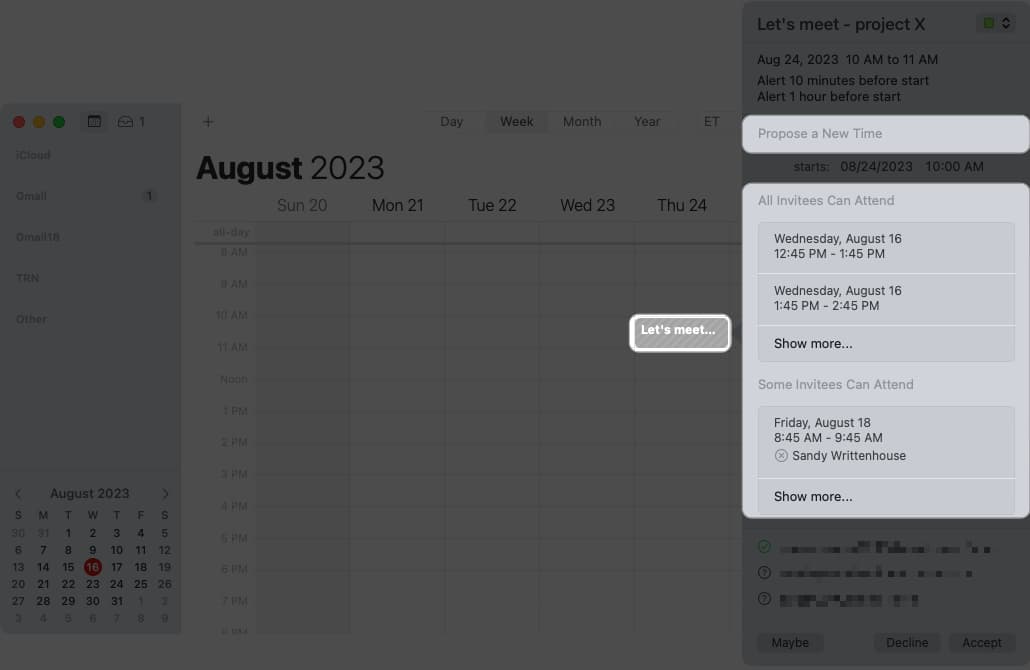
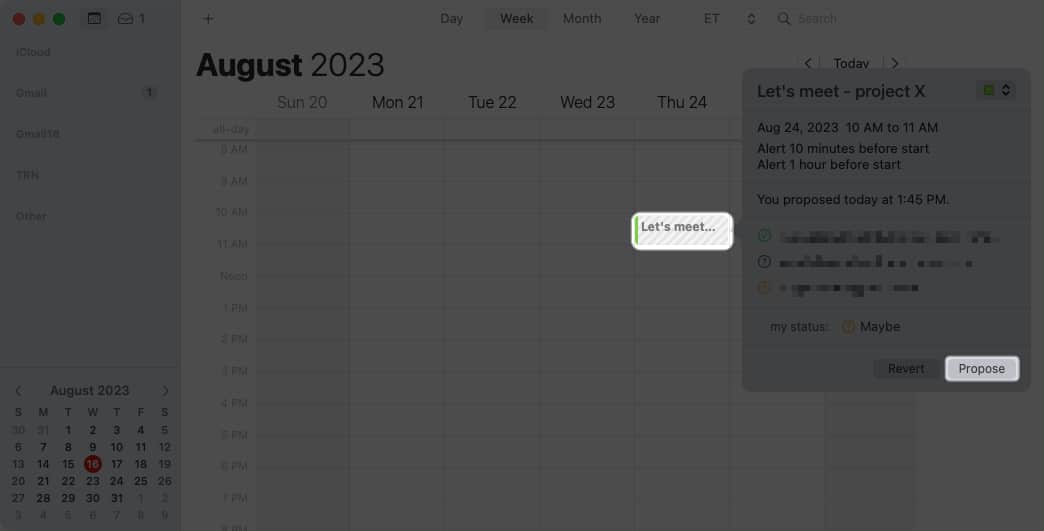
13. Propose new time for an event
If you’ve been invited to an event and then need to reschedule it, you can propose a new time to the event organizer two different ways in Calendar on Mac.
14. Search for an event
Have you ever needed to find an event in the past? Maybe you couldn’t recall when it was but wanted to see who attended, open its attachment, or read the notes. You can search for an event in the Calendar app just like you can search for an image in Photos on Mac.
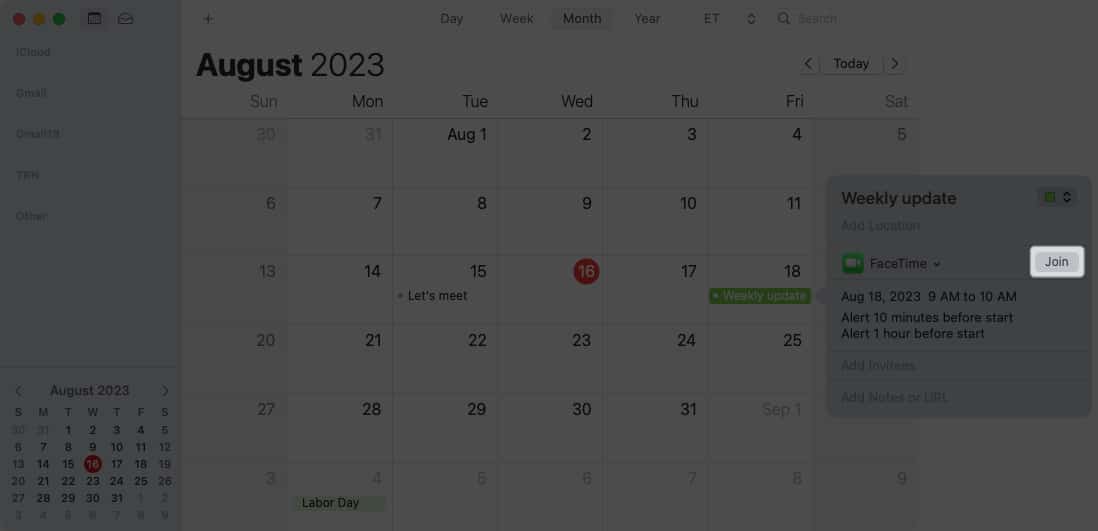
15. Schedule a video call
Video calls are super popular these days, with so many people working remotely. Luckily, you don’t need Google Meet or Zoom if your participants use FaceTime. For more details on this feature or to use it on iPhone or iPad too, check out our how-to for scheduling FaceTime calls. Be an Apple Calendar pro Whether you want to do something on a bigger scale, like merge two calendars together, or something smaller, like change the start day for the week, these tips and tricks to using Apple Calendar on Mac should turn you into a pro! Do you have handy Calendar tips of your own you’d like to share? Let us know in the comments. Read more:
Tips to use Apple Numbers on Mac effectively Apple Music tips and tricks for iPhone Tips to use Apple Pages on Mac like a pro!
🗣️ Our site is supported by our readers like you. When you purchase through our links, we earn a small commission. Read Disclaimer. View all posts
Δ
![]()
![]()
![]()


![]()


![]()